Oracle JDeveloper 11g alone doesn't have the SOA capability. In order to create SOA application using JDeveloper 11g you need to install Oracle SOA JDeveloper extension to JDeveloper first.
The following are the steps which demonstrate how to do so from the downlaoded SOA JDeveloper extension file.
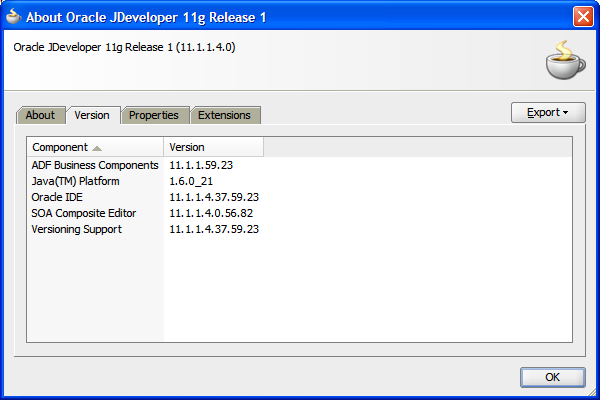
The JDeveloper 11g I are using is Studio version 11.1.1.4.0.

Step 1. First downlaod the SOA extension file from Oracle Fusion Middleware Products Update Center to your local. Its URL is: http://www.oracle.com/ocom/groups/public/@otn/documents/webcontent/156082.xml
Note: You must choose the matched version of SOA extention for your JDeveloper. Otherwise you might not be able to use SOA capability of this extension in JDeveloper.
For JDeveloper verison 11.1.4.0 I choose the verison 11.1.1.4.0.58.62 for Oracle SOA Composite Editor.
After the successful download, the extension file is in your local file system as: soa-jdev-extension.zip
Step 2. Start your JDeveloper and select the menu item: Help/Check for updates...


And the following window is pop up and click on the Next button.
Step 3. Select Install from Local File from the following popup and browse your local file system to put the downloaded extension file into FileName and then click on Next button.

Step 4. The popup window will show the summary information of the extension to be installed. After the confirmation click on the Finish button.

Step 5. JDeveloper will pop up the window to prompt the restart is needed to finish the installation. Click on Yes button to restart JDeveloper.

Step 6. After the restart of JDeveloper Oracle JDeveloper SOA extention is installed. We can
verify the installation by clicking on Help/About menu item. If SOA Composite Editor appers it means that the installation is successful.

Once the installation is done successfully you can build the SOA project using JDeveloper.
