Monday, August 8, 2011

Alter external web service endpoint in Oracle SOA

When we invoke one external web service from Oracle SOA component such as BPEL the end point of this web service sometimes is defined in the service wsdl file:


But in reality most time the end point specified in wsdl can not be used since the SOA component application may be deployed on different environments and the end points of the external web services vary depending on the various environments.

Oracle SOA 11g provides several ways to allow you change the end point during the deployment.

One way is to use Oracle SOA EM to do so.

First select the deployed SOA application in Oracle SOA EM and the dashboard of this application is displayed on the right panel.

Then go down to the bottom in the right panel and find Services and References and click on the web service reference to be changed.

Then click on the tab Properties. It will display as the below:

Then type in the new end point address in End Point Address text edit and then click on Apply button.


However the better way to do this is through config plan. You can create the config plan from JDeveloper by
right clicking composite.xml file and then select Generate Config Plan.

In the config plan you can specify the property value you want to replace with new value and when you deploy your SOA application you need to attach this config plan. After the deployment the new value from the config plan will be used.

Here is one example of config plan:


Here in the config plan we specify to replace the NO Target Address in TestProviderService.wsdl with new end pint address.

Then when you deploy the application with JDeveloper remember to attach this config plan.


After the successful deployment the new end point value will be used for this external web service.


Thursday, August 4, 2011

JMS Adapter Operation Types

Oracle SOA 11g JMS adapter provides 3 types of operations:
  1. Consume Message
  2. Produce Message
  3. Request/Reply
Consumer Message operation is used to receive inbound message from JMS destination. A receive activity is needed in the BPEL.

Produce Message operation is for sending outbound message into JMS destination. This operation is executed via BPEL invoke activity.

The third operation is Request/Reply. This operation involves two-way message flow: sending the request message to the JMS destination and receiving the response message from another JMS destination. The advantages of this operations is that you just need to configure one adapter for sending and receiving the messages and also the request and response correlation can be handled automatically by the adapter itself.

Request/Reply operation has two modes: synchronous and asynchronous. When using synchronous mode you just need to use invoke activity in your BPEL.


With asynchronous mode you need one invoke activity to send the request message and another activity: receive to receive the response message.

Throttling JMS message in JMS Adapter

Sometimes you need to throttle the JMS messages that will be processed by BPEL instances. For example you may need to consume the next message only after the BPEL instance finish the current message. You can achieve this by making one-way consume operation into two-way consume operation so the consume is not finished until a reply is generated. The next JMS message will consumed only after the processing of previous message is finished.

The original WSDL is like:

This added output message must be a empty message. So the modified WSDL will be as the below:


Wednesday, August 3, 2011

One issue I found with JDeveloper 11.1.1.4 BPEL

I found one issue with JDeveloper 11.1.1.4 with SOA extension when I was designing one BPEL process. What I was trying to do is to dynamically set the queue name with JMS adapter in BPEL. The queue name is stored in the variable: RuleInputOutput which is of the type: ProviderRouting. The structure of ProviderRouting is shown in the following diagram.


The key of implementing dynamically JMS routing is to set the JMSDestinationName property in the invoke activity. So I tried to set this property value from the variable: RuleInputOutput in the invoke setting window as shown below.


After selecting the right element then clicked on several OK buttons in the different popup window. Everything looked fine so far.

Next I was trying to build the BPEL process and found I got some compiler error messages as shown as the below:


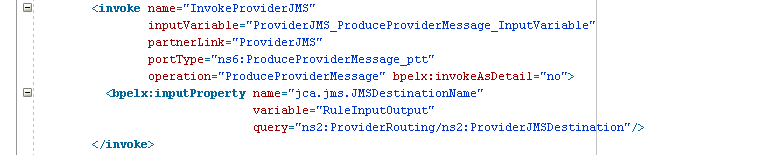
I went to BPEL design panel and clicked on Source tab to see the source code of BPEL. What I found is that after setting JMSDestinationName using invoke setting winodw JDeveloper generated some following codes:


After scratching my head for a while I realized that the query in setting JMSDestinationName is not so right. It is missing one slash in the beginning of the query. After correcting this as the below diagram the BPEL can be built without any compiler error.


Remote Interface vs. Local Intereface

Annotation @Remote defines the remote interface which has the implication in performance. The arguments in the method are passed by value instead of by reference. The arguments will be serialized.
When invoking the remote method the network and RMI overhead will be involved.

Tuesday, July 26, 2011

Use JmsAdapter in Oracle SOA 11g BPEL

In Oracle SOA 11g adapters are using JCA 1.5 specification to connect to the underlying resources such as JMS, database, file/ftp, sockets and etc.


There 3 steps to do in order to successfully use JmsAdapter to access the JMS destination in Oracle Bpel.


  • Add JmsAdapter into your Bpel in JDeveloper. Adding it is actually following the steps of Adapter Configuration Wizard.

Wizard Step 2: Give the service name to JMS Adapter.

Wizard Step 3: Select Oracle Weblogc JMS as JMS provider.


Wizard Step 4: Specify the application server for connection.

Wizard Step 5: Select to define from operation and schema as the adapter interface.

Wizard Step 6: This adapter is used to produce message.


Wizard Step 7: Specify the JMS destination and JNDI name for the connection factory.
Please note here: Destination name is the JNDI name for the destination used in normal JEE JMS resource.
And connection factory is the JNDI name used in JMS Adapter rather than JNDI in normal JEE JMS resource.


Wizard Step 8: Specify the schema for the payload of the JMS message.


After all wizard steps are finished, one .jca file is created where the connection factory and destination are specified.

  • Configure deployed JmsAdapter from Console to add outbound connection.

Click on Your domain/Deployments in Console and then select JmsAdapter.


Click on Configuration tab and then click on Outbound Connection Pools and then expand the group oracle.tip.adapters.jms.IJmsConnectionFactory.


Click the New button and select oracle.tip.adapters.jms.IJmsConnectionFactory.


Click on Next button and type in JNDI name for Outbound Connection Instance.
Please note here: This JNDI name should be the same as you specify in Wizard Step 7 when configuring Adapter in JDeveloper and then click on Finish button.


Modify the property of ConnectionFactoryLocation of this new created Outbound Connection.
Select your domain/Deployments/JmsAdaoter and then select Configuration tab and then expand oracle.tip.adpater.jms.IJmsConnectionFactory. Click on the new created Outbound connection: eis/wls/InventoryQueueConnectionFactory and then click on


Then type in the JNDI name of JMS connection factory as the value to the property: ConnectionFactoryLocation.


  • Configure physical JMS destination and connection factory in Oracle Weblogic Enterprise Manager.
Click on your domain/Services/Messaging/JMS Modules


Select KMS Module: SOAJMSModule.


Click on New Button to create the JMS destination.


Select the type of resource to be created as Queue and then click on Next button.


Type in the name of the physical queue and JNDI name for this queue and then click on Finish button.
Repeat the creation process to create the JMS connection factory.


Click on New button.


Select the type of resource to be created as Connection Factory and then click on Next button.


Type in the name for the queue connection factory and JNDI name for this connection factory.
Please note: This JNDI name should be the same as the value of the property
Finally click on Finish button.

  • Test the JMS message is sent to the queue.
After successfully running your BPEL one message should be sent to the queue. It can be verified using Console.
Click on your domain/Services/JMS Modules in Console and then click on SOAJMSModule.


Find your queue destination and click on it and then click on Monitoring tab.


And you will find there is one message in the queue destination. Select this queue and click on Show Messages to see the content of the message payload.


Click on the message ID and the content of the message is displayed.